
Mini Vanilla New York-Style Cheesecake Recipe | Quick & Easy
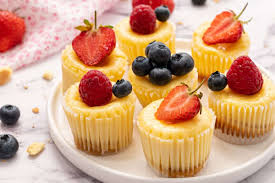
Get ready to indulge in the irresistible flavors of homemade mini vanilla New York-style cheesecakes! These bite-sized treats offer the perfect balance of a rich, creamy filling and a buttery graham cracker crust. All in a conveniently portioned dessert. Whether you're craving a classic New York-style cheesecake or a quick and easy dessert option, our recipe delivers the perfect solution.
Prepare to be wowed by the velvety smooth texture and the tantalizing aroma of these vanilla cheesecake bites. Crafted with a time-honored New York-style recipe, our mini cheesecakes capture the essence of this beloved dessert in a delightful, single-serve format. Enjoy the convenience of individual portions while savoring the same decadent flavors that have made New York-style cheesecake a beloved classic.
Key Takeaways
- Delicious homemade mini vanilla New York-style cheesecakes
- Rich, creamy filling and buttery graham cracker crust
- Convenient individual portions
- Classic New York-style flavor profile
- Quick and easy to prepare
The Perfect Mini Cheesecake: A Bite-Sized Classic
Enjoy the timeless charm of the New York-style cheesecake, now in a delightful mini size. This dessert has been loved for over a century. It's a mix of the city's diverse tastes and traditions.
History of New York-Style Cheesecake
The New York cheesecake started with the city's dairy industry and immigrant bakers. They mixed different ingredients to create its dense, creamy texture. Over time, it has stayed a favorite, loved by many.
Why Choose Mini Portions
- Portion control: Mini cheesecakes are great for individual servings. They help manage portions and satisfy cravings.
- Versatility: These treats are perfect for any event. They suit many tastes and serving sizes.
- Convenience: Mini cheesecakes are easy to serve. No need to slice a big cake.
Mini desserts, like the mini New York-style cheesecake, are very popular. They let you enjoy a classic dessert in a controlled portion. This way, you can satisfy your sweet tooth without overdoing it.
"The mini cheesecake is the perfect solution for those who crave the classic New York-style flavor in a bite-sized portion."
Essential Ingredients for Mini Vanilla New York-Style Cheesecake Recipe
Making a perfect mini vanilla New York-style cheesecake requires the right ingredients. From the graham cracker crust to the creamy filling, each part is key. They work together to bring out the classic rich and indulgent taste.
Graham Cracker Crust Components
- Graham cracker crumbs: The crust's base, offering a sweet and buttery taste.
- Unsalted butter: Holds the crumbs together, making the crust firm and crisp.
- Granulated sugar: Adds sweetness to match the graham crackers.
Creamy Filling Ingredients
The cheesecake filling is the main attraction. It's made of a few important parts:
- Cream cheese: The main ingredient, giving the cheesecake its dense and creamy texture.
- Granulated sugar: Sweetens the filling, balancing the cream cheese's tanginess.
- Eggs: Mix the ingredients together, making the filling smooth and cohesive.
- Vanilla extract: Adds a lovely aromatic flavor to the cheesecake.
Optional Toppings and Garnishes
You can make the cheesecake even better with various toppings and garnishes:
| Topping | Flavor Profile |
|---|---|
| Fresh berries (e.g., strawberries, blueberries, raspberries) | Brings a burst of freshness and natural sweetness |
| Caramel sauce | Offers a rich, decadent contrast to the creamy filling |
| Chopped nuts (e.g., pecans, walnuts) | Adds a crunchy texture and nutty flavor |
| Whipped cream | Enhances the creamy texture and adds a light, airy topping |
Choosing the right ingredients for the cheesecake crust recipe, cream cheese filling, and cheesecake toppings is crucial. This way, you can make a truly exceptional mini vanilla New York-style cheesecake. It will surely impress your taste buds.
https://www.youtube.com/watch?v=T0e6vftZ8BQ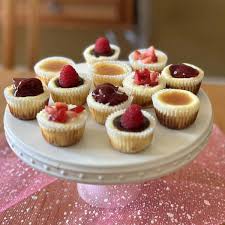
Kitchen Tools and Equipment Needed
To make delicious mini vanilla New York-style cheesecakes, you need some key kitchen tools and equipment. We've listed everything you'll need to make these tasty treats. From special pans to common baking tools, we've got you covered.
Specialized Equipment
- Mini cheesecake pan or muffin tin: These pans help your mini cheesecakes bake perfectly and are easy to remove.
- Food processor or blender: They make blending the cheesecake filling smooth and creamy.
Baking Essentials
- Stand mixer or hand mixer: They whip the filling to the right consistency.
- Measuring cups and spoons: Accurate measurements are key for the crust and filling.
- Spatula: It's used to smooth the filling and remove the cheesecakes from the pan.
- Parchment paper or non-stick cooking spray: These prevent the cheesecakes from sticking to the pan.
| Kitchen Tool | Importance |
|---|---|
| Mini Cheesecake Pan | Ensures proper portion size and easy removal of individual cheesecakes. |
| Food Processor | Blends the cheesecake filling into a smooth, creamy texture. |
| Stand Mixer | Whips the filling to the perfect consistency for a light, airy texture. |
While specialized mini cheesecake pans are best, a standard muffin tin works too. Just remember to adjust the baking time. With these baking essentials and a few kitchen gadgets, you can make delightful mini cheesecakes at home.
Step-by-Step Preparation Guide
Making the perfect mini vanilla New York-style cheesecake is an art. It needs precision and attention to detail. We'll show you how to make the crust, mix the filling, and bake it right.
Creating the Perfect Crust
The crust is the base of a great cheesecake. To get a buttery, crisp crust, mix graham cracker crumbs, melted butter, and sugar. Carefully press the mixture into the bottom and up the sides of your mini cheesecake pans, ensuring an even thickness. This step is key for the creamy filling to come.
Mixing the Filling
The filling's smoothness comes from the right mix of ingredients. Cream together cream cheese, sugar, and vanilla until light and fluffy. Carefully fold in eggs, one at a time, to create a silky-smooth texture. This is the secret to our mini New York-style cheesecakes' flavor.
Baking Tips and Techniques
- Preheat your oven to a precise temperature of 325°F (165°C) for best results.
- Gently pour the filling into the prepared crust-lined pans, being mindful not to overfill.
- Bake the cheesecakes for 20-25 minutes, or until the centers are almost set.
- Allow the cheesecakes to cool completely before refrigerating for at least 4 hours, or overnight.
By following these cheesecake baking instructions and crust preparation techniques, your mini vanilla New York-style cheesecakes will be perfect. They'll be creamy, smooth, and ready to impress your taste buds.
https://www.youtube.com/watch?v=3Am4DfPB2Dk
Troubleshooting Common Cheesecake Issues
Making the perfect mini vanilla New York-style cheesecake can be tricky. But don't worry, we've got you covered! We'll tackle common problems like cheesecake cracks, overbaking, and texture issues. With our help, your mini cheesecakes will be perfect every time.
Preventing Cracks in Your Cheesecake
Cracks on the surface of cheesecakes are a big problem. They can be caused by overbaking, rapid temperature changes, or overbeating the batter. To avoid cracks, remember to:
- Don't overbake your cheesecake. Watch the time and temperature closely.
- Let the cheesecake cool slowly by turning off the oven.
- Mix the batter gently to avoid air bubbles that can cause cracks.
Achieving the Perfect Texture
If your mini cheesecakes are grainy or dense, it's likely due to ingredient or mixing problems. For a smooth, creamy texture, try:
- Use room-temperature cream cheese and other dairy for better mixing.
- Avoid overmixing to prevent a tough texture.
- Add sour cream or heavy cream for a richer, creamier filling.
By fixing these common issues, you'll be on your way to baking perfect mini vanilla New York-style cheesecakes. Enjoy the delicious fruits of your labor!
Storage Tips and Serving Suggestions
Keeping your homemade mini vanilla New York-style cheesecakes fresh is key. We've got tips for storing and serving them perfectly. Enjoy them now or later with our help.
Proper Storage Methods
To keep your mini cheesecakes fresh and creamy, follow these steps:
- Refrigeration: Store them in an airtight container in the fridge for up to 5 days. This keeps them moist and creamy.
- Freezing: Freeze them for longer storage. Wrap each in plastic or foil, then in a bag or container. They'll last up to 2 months.
- Thawing: To serve, thaw frozen cheesecakes in the fridge overnight. They'll be ready for a delicious treat.
Creative Presentation Ideas
Make your mini cheesecakes a showstopper with these presentation ideas:
- Place them on a platter or stand. Top with berries, powdered sugar, or caramel sauce for a fancy look.
- Put each cheesecake in a dessert cup or ramekin. It's a fun way for everyone to have their own.
- Set up a mini cheesecake bar. Let guests add their favorite toppings and sauces.
Best Serving Temperature
Serve your mini cheesecakes at room temperature for the best taste and texture. This lets the creamy filling soften and the flavors shine. If they're chilled, let them sit at room temperature for 15-20 minutes before serving.
| Storage Method | Maximum Shelf Life |
|---|---|
| Refrigerator | 5 days |
| Freezer | 2 months |
"Proper storage and presentation are the keys to ensuring your mini cheesecakes maintain their irresistible texture and flavor."
Conclusion
In our journey through the delightful world of homemade mini cheesecakes, we've uncovered the secrets to crafting these bite-sized New York-style treats. From the perfect graham cracker crust to the rich and creamy filling, this easy dessert recipe has allowed us to savor the essence of a classic cheesecake in a convenient and portable form.
Whether you're a seasoned baker or a novice in the kitchen, this mini vanilla cheesecake recipe is sure to impress. The simplicity of the preparation process, coupled with the depth of flavor, makes it an ideal choice for any occasion - from casual gatherings to elegant dinner parties. So, we encourage you to venture into your kitchen, whip up a batch of these delightful treats, and let your taste buds be the judge of their irresistible goodness.
Remember, the beauty of this recipe lies not only in its exceptional taste but also in its versatility. Feel free to experiment with different toppings and garnishes to make each batch uniquely your own. Embrace the endless possibilities and let your creativity shine as you discover new ways to elevate these homemade mini cheesecakes to the next level.
FAQ
What is the secret to the perfect mini vanilla New York-style cheesecake?
The secret to our mini vanilla New York-style cheesecakes is using top-notch ingredients. We also focus on getting the flavors just right and following exact baking steps. Every part, from the crust to the creamy filling, is made with care to bring you that classic New York taste and feel.
Why are mini cheesecakes a popular choice?
Mini cheesecakes are loved for many reasons. They're the perfect size for a single serving, making them easy to manage. Plus, they look fancy on any dessert table. You can also customize them easily, which makes them fun to make and share.
What equipment do I need to make these mini cheesecakes?
To whip up our mini vanilla New York-style cheesecakes, you'll need some basic kitchen tools. You'll need a mini cheesecake pan or muffin tin, a mixer, and a springform pan or ramekins. Don't forget measuring cups, a spatula, and a parchment-lined baking sheet.
How do I prevent my mini cheesecakes from cracking?
To avoid cracks in your mini cheesecakes, follow a few tips. Don't overmix the filling, as it can introduce too much air. Also, slowly increase the oven temperature towards the end of baking to help them set smoothly. Cooling and chilling them right is key for a smooth surface.
Can I make these mini cheesecakes ahead of time?
Yes, you can make these mini cheesecakes ahead of time. After baking and cooling, store them in an airtight container in the fridge for up to 5 days. Or, freeze them for up to 2 months. This makes them a great choice for any occasion.

You must be logged in to post a comment.